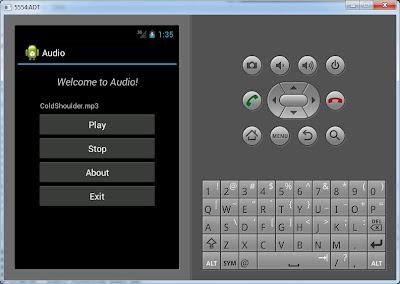
Tiếp bước các bài Android trước, bài hôm nay mình muốn giới thiệu đến các bạn là bài Audio(trình nghe nhạc chạy trên Android).
Bước 1: Khởi tạo giao diện cho nó main.xml
<?xml version="1.0" encoding="utf-8"?>
<ScrollView
xmlns:android="http://schemas.android.com/apk/res/android"
android:layout_width="fill_parent"
android:layout_height="fill_parent"
android:padding="10dip">
<!-- Get text content from values strings.xml -->
<TextView
android:id="@+id/about_content"
android:layout_width="wrap_content"
android:layout_height="wrap_content"
android:text="@string/about_text" />
</ScrollView>
Bước 2: Làm cái giao diện trình diễn music giaodien.xml
<?xml version="1.0" encoding="utf-8"?>
<LinearLayout xmlns:android="http://schemas.android.com/apk/res/android"
android:orientation="vertical"
android:layout_width="fill_parent"
android:layout_height="fill_parent"
android:padding="20dip">
<LinearLayout
android:orientation="vertical"
android:layout_width="fill_parent"
android:layout_height="wrap_content"
android:layout_gravity="center"
android:paddingLeft="20dip"
android:paddingRight="20dip">
<TextView
android:text="@string/hello"
android:layout_width="fill_parent"
android:layout_height="wrap_content"
android:layout_gravity="center"
android:layout_marginBottom="20dip"
android:textSize="20sp"
android:textStyle="italic" android:gravity="center"/>
<TableLayout
android:layout_height="wrap_content"
android:layout_width="wrap_content"
android:layout_gravity="center"
android:stretchColumns="*">
<TableRow >
<ListView xmlns:android="http://schemas.android.com/apk/res/android"
android:id="@id/android:list"
android:layout_width="wrap_content"
android:layout_height="wrap_content">
</ListView>
</TableRow>
<TableRow>
<Button
android:id="@+id/play_button"
android:text="@string/play_label" />
</TableRow>
<TableRow>
<Button
android:id="@+id/stop_button"
android:text="@string/stop_label" />
</TableRow>
<TableRow>
<Button
android:id="@+id/about_button"
android:text="@string/about_label" />
</TableRow>
<TableRow>
<Button
android:id="@+id/exit_button"
android:text="@string/exit_label" />
</TableRow>
</TableLayout>
</LinearLayout>
</LinearLayout>
Bước 3: Tạo cho nó một chuỗi values với strings.xml
<?xml version="1.0" encoding="utf-8"?>
<resources>
<!-- Basic -->
<string name="hello">Welcome to Audio!</string>
<string name="app_name">Audio Pro</string>
<!-- Control -->
<string name="play_label">Chơi</string>
<string name="pause_label">Tạm dừng</string>
<string name="stop_label">Dừng</string>
<string name="about_label">Giới thiệu</string>
<string name="exit_label">Thoát</string>
<!-- About -->
<string name="about_title">Giới thiệu</string>
<string name="about_text">
<b>Create by:</b>\n
DotNet Group A-Z: DNGAZ.com
</string>
<!-- Other -->
</resources>
Bước 4: Cái Item chào gọi :) item.xml
<?xml version="1.0" encoding="utf-8"?>
<TextView xmlns:android="http://schemas.android.com/apk/res/android"
android:id="@+id/item"
android:layout_width="wrap_content"
android:layout_height="wrap_content"
android:padding="5dp"
android:text="@string/app_name"/>
Bước 5: bước này khá quan trọng, viết chương trình thực thi xử lý các sự kiện tương ứng. Làm các bước trên mà không thực hiện bước này thì cạp đất mà ăn ^_^!
package quangit.media.Audio;
import java.io.File;
import java.io.FilenameFilter;
import java.util.ArrayList;
import java.util.List;
import android.app.ListActivity;
import android.content.Intent;
import android.media.MediaPlayer;
import android.media.MediaPlayer.OnCompletionListener;
import android.os.Bundle;
import android.util.Log;
import android.view.KeyEvent;
import android.view.View;
import android.view.View.OnClickListener;
import android.widget.ArrayAdapter;
import android.widget.Button;
import android.widget.ListView;
import android.widget.Toast;
public class Audio extends ListActivity implements OnClickListener{
// Interface components
private View playButton, stopButton, aboutButton, exitButton;
// Store list songs
private List<String> listFilesApp = new ArrayList<String>();
// Position of a song in list
private int position=-1; // Not choose any song
// Path of Songs Folder
private static final String pathFilesApp="/sdcard/Audio/";
// Media Object
private MediaPlayer mp = new MediaPlayer();
/**-----------------------------------------------------------------
* Application's basic methods
* ----------------------------------------------------------------- */
@Override
public void onCreate(Bundle savedInstanceState) {
// TODO Auto-generated method stub
super.onCreate(savedInstanceState);
// Call layout giaodien.xml
setContentView(R.layout.giaodien);
// Search View
playButton = this.findViewById(R.id.play_button);
stopButton = this.findViewById(R.id.stop_button);
aboutButton = this.findViewById(R.id.about_button);
exitButton = this.findViewById(R.id.exit_button);
// Setup click listeners for all the buttons
playButton.setOnClickListener(this);
stopButton.setOnClickListener(this);
aboutButton.setOnClickListener(this);
exitButton.setOnClickListener(this);
// Add list songs to layout
addSongsToList();
ArrayAdapter<String> t_l = new ArrayAdapter<String>(this, R.layout.item, listFilesApp);
setListAdapter(t_l);
//mp=MediaPlayer.create(this, R.raw.handdrums);
}
@Override
protected void onStart() {
// TODO Auto-generated method stub
super.onStart();
}
@Override
protected void onRestart() {
// TODO Auto-generated method stub
super.onRestart();
}
@Override
protected void onPause() {
// TODO Auto-generated method stub
super.onPause();
}
@Override
protected void onResume() {
// TODO Auto-generated method stub
super.onResume();
}
@Override
protected void onStop() {
// TODO Auto-generated method stub
super.onStop();
}
@Override
protected void onDestroy() {
// TODO Auto-generated method stub
super.onDestroy();
}
public void exitApp(){
stopSong();
Intent i_exit = new Intent(Intent.ACTION_MAIN);
i_exit.addCategory(Intent.CATEGORY_HOME);
i_exit.setFlags(Intent.FLAG_ACTIVITY_NEW_TASK);
startActivity(i_exit);
}
/**-------------------------------------------------------------
* Events handler methods
* ------------------------------------------------------------- */
// Handling buttons events
public void onClick(View v) {
switch (v.getId()) {
case R.id.play_button:
pauseSong();
break;
case R.id.stop_button:
stopSong();
break;
case R.id.about_button:
Intent i_about = new Intent(this, AudioActivity.class);
startActivity(i_about); //Set activity for class About.java
break;
case R.id.exit_button:
exitApp();
break;
default:
break;
}
}
// Handling keyboard events
@Override
public boolean onKeyDown(int keyCode, KeyEvent event) {
// TODO Auto-generated method stub
switch (keyCode) {
case KeyEvent.KEYCODE_BACK:
exitApp();
break;
case KeyEvent.KEYCODE_HOME:
exitApp();
break;
default:
return super.onKeyDown(keyCode, event);
}
return true;
/**
if (keyCode == event.KEYCODE_BACK){
finish(); // Exit Audio
return true;
}
return super.onKeyDown(keyCode, event);
*/
}
/**-----------------------------------------------------
* Audio application methods
* ----------------------------------------------------- */
// Class File Filter
class FileFilter implements FilenameFilter{
@Override
public boolean accept(File dir, String filename) {
// TODO Auto-generated method stub
return (filename.endsWith(".mp3")
|| filename.endsWith(".wav")
|| filename.endsWith(".mid"));
}
}
// Add songs to list
public void addSongsToList(){
File t_f = new File(pathFilesApp);
for (File file: t_f.listFiles(new FileFilter())) {
listFilesApp.add(file.getName());
}
}
// Click a song on list songs
@Override
protected void onListItemClick(ListView _l, View _v, int _p, long _id) {
// TODO Auto-generated method stub
super.onListItemClick(_l, _v, _p, _id);
// Play the song is clicked ~ It is the current song is playing
playSong(pathFilesApp + listFilesApp.get(_p));
// Save position of current song is playing
position = _p;
// Show info of the current song is playing
Toast.makeText(getApplicationContext(), listFilesApp.get(_p), Toast.LENGTH_LONG).show();
}
// Play a song
public void playSong(String _path){
try {
//stopSong();
mp.reset();
mp.setDataSource(_path);
mp.prepare();
mp.start();
// Label button
Button t_bt = (Button)playButton;
t_bt.setText("Dừng");
// Auto play next song
mp.setOnCompletionListener(new OnCompletionListener() {
@Override
public void onCompletion(MediaPlayer mp) {
// TODO Auto-generated method stub
playNextSong();
}
});
}catch(Exception e){
// TODO: handle exception
Log.v("AudioPlayer", e.getMessage());
}
}
// Pause song
public void pauseSong(){
if(mp.isPlaying()){
mp.pause();
Button t_bt = (Button)playButton;
t_bt.setText("Chơi");
}else{
if(position != -1){
mp.start();
Button t_bt = (Button)playButton;
t_bt.setText("Dừng");
}
}
}
// Stop song
public void stopSong(){
if(mp.isPlaying()){
mp.reset();
position=-1; // Not choose any song
Button t_bt = (Button)playButton;
t_bt.setText("Chơi");
}
}
// Restart song
public void restartSong(){
mp.seekTo(0); // Reset song's time line
}
// Play next song
public void playNextSong(){
if(++position >= listFilesApp.size()){
position=0;
}else{
playSong(pathFilesApp + listFilesApp.get(position)) ;
}
}
}
Bước 6: Chỉnh cái AndroidManifest.xml
<?xml version="1.0" encoding="utf-8"?>
<manifest xmlns:android="http://schemas.android.com/apk/res/android"
package="quangit.media.Audio"
android:versionCode="1"
android:versionName="1.0" >
<uses-sdk android:minSdkVersion="15" />
<application
android:icon="@drawable/ic_launcher"
android:label="@string/app_name" >
<activity
android:name=".Audio"
android:label="@string/app_name" >
<intent-filter>
<action android:name="android.intent.action.MAIN" />
<category android:name="android.intent.category.LAUNCHER" />
</intent-filter>
</activity>
</application>
</manifest>
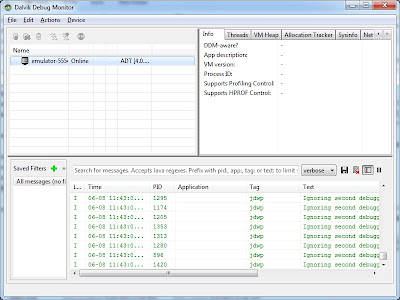
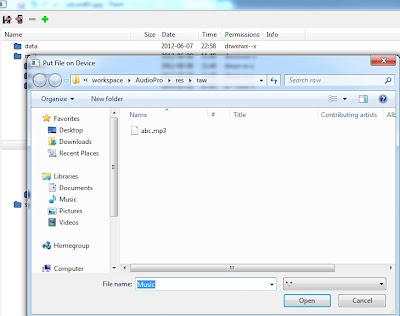
Bước 7: Bước này cũng khá quan trọng. Tại giao diện rồi, thực thi rồi, nhưng không có thư viện music thì nghe bằng gì. Để thêm nhạc vào thư viện nghe, vào SDcard để thêm bằng cách vào thư mục SDK>bin>chạy ddms.bat(VD: E:\eclipse\android-sdk-windows\tools\ddms.bat)
Click chọn emulator tương ứng, tự động load list bên dưới
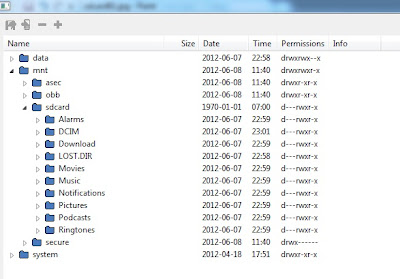
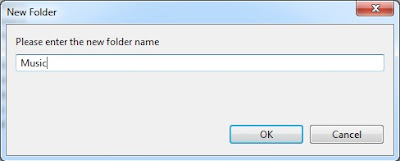
Vào Device>File Explorer>chọn mnt>sdcard. Tạo thư mục mới bằng cách nhấn vào dấu cộng và nhập tên như hình:
Tại thư mục music(do Tôi đặt tên), chọn hình biểu tượng điện thoại và add music vào
Run Application
