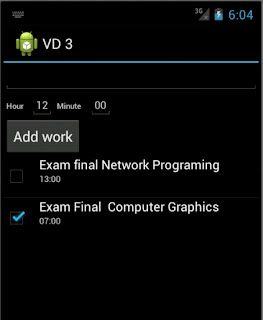
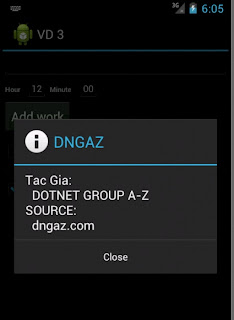
Bài trước mình đã hướng dẫn các bạn cách xây dựng giao diện đơn giản. Trong bài này mình sẽ hướng dẫn cách tạo 1 custom ViewGroup, sử dụng ViewGroup này vào ListView, và cuối cùng là tạo 1 Option Menu. Đây cũng sẽ là bài cuối cùng mình viết về làm việc với View, các bài sau sẽ chuyển qua Intent và BroadCast Receiver.
ViewGroup thông thường chúng ta hay gặp là LinearLayout, Relative Layout. Xây dựng custom ViewGroup cho phép chúng ta tạo 1 tập các widget được sắp xếp theo ý muốn rồi đưa vào sử dụng.
Yêu cầu: Xây dựng ứng dụng dạng To Do List: Cho phép nhập vào nội dung công việc và thời gian thực hiện công việc rồi đưa vào list công việc. Cho phép xóa các công việc khỏi list.
B1: Khởi tạo project: File -> New -> Android Project
Build Target: Chọn Android 4.0.3(mình đang xài bản này)
Application name: Example 3
B2: Xây dựng custom view group trong XML. Đi tới res\layout tạo 1 file XML mới là list.xml. Gõ nội dung sau vào:
<?xml version="1.0" encoding="utf-8"?>
<LinearLayout
xmlns:android="http://schemas.android.com/apk/res/android"
android:layout_width="wrap_content"
android:layout_height="wrap_content"
android:orientation="horizontal">
<CheckBox
android:id="@+id/check_work"
android:layout_width="wrap_content"
android:layout_height="wrap_content"
android:text=""
android:paddingTop="45px"
android:paddingRight="10px"
/>
<LinearLayout
android:layout_width="wrap_content"
android:layout_height="wrap_content"
android:orientation="vertical"
>
<TextView
android:id="@+id/work_content"
android:textSize="24px"
android:layout_width="wrap_content"
android:layout_height="wrap_content"
android:lines="1"
android:textColor="@color/work_color"
/>
<TextView
android:id="@+id/time_content"
android:textSize="16px"
android:layout_width="wrap_content"
android:layout_height="wrap_content"
android:lines="1"
android:textColor="@color/time_color"
/>
</LinearLayout>
</LinearLayout>
Custom ViewGroup của chúng ta ở đây khá đơn giản, đó là 1 LinearLayout chứa 2 thành phần: 1 CheckBox và 1 LinearLayout khác gồm 2 TextView để hiển thị nội dung công việc và thời gian.
B3: Đã xong giao diện cho custom ViewGroup, chúng ta sẽ thiết kế giao diện cho chương trình trong main.xml. Ở đây mình dùng lại giao diện của Example 2 trong bài 2.
<?xml version="1.0" encoding="utf-8"?>
<LinearLayout xmlns:android="http://schemas.android.com/apk/res/android"
android:orientation="vertical"
android:layout_width="fill_parent"
android:layout_height="fill_parent"
>
<EditText
android:id="@+id/work_enter"
android:layout_width="fill_parent"
android:layout_height="wrap_content"
android:hint="@string/work_hint"
android:lines="1"
android:textSize="24px"
/>
<LinearLayout
android:layout_width="wrap_content"
android:layout_height="wrap_content"
android:orientation="horizontal"
>
<TextView
android:layout_width="50px"
android:layout_height="wrap_content"
android:text="@string/hour_edit"
android:typeface="normal"
android:textSize="15px"
android:textStyle="bold"
android:padding="5px"
/>
<EditText
android:id="@+id/hour_edit"
android:layout_width="45px"
android:layout_height="wrap_content"
android:hint="12"
android:textColorHint="@color/hint_color"
android:textSize="20px"
android:gravity="center"
android:padding="5px"
android:numeric="integer"
android:maxLength="2"
/>
<TextView
android:layout_width="65px"
android:layout_height="wrap_content"
android:text="@string/minute_edit"
android:typeface="normal"
android:textSize="15px"
android:textStyle="bold"
android:padding="5px"
/>
<EditText
android:id="@+id/minute_edit"
android:layout_width="45px"
android:layout_height="wrap_content"
android:hint="00"
android:textColorHint="@color/hint_color"
android:textSize="20px"
android:gravity="center"
android:padding="5px"
android:numeric="integer"
android:maxLength="2"
/>
</LinearLayout>
<Button
android:id="@+id/button"
android:layout_width="wrap_content"
android:layout_height="wrap_content"
android:gravity="center"
android:text="@string/button_content"
/>
<ListView
android:id="@+id/list"
android:layout_width="fill_parent"
android:layout_height="wrap_content"
/>
</LinearLayout>
B4: Tạo file colors.xml trong res\value:
<?xml version="1.0" encoding="utf-8"?>
<resources>
<color name="work_color">#ffffff</color>
<color name="time_color">#cccccc</color>
<color name="hint_color">#cccccc</color>
</resources>
work_color là màu của nội dung công việc trong list. time_color màu của thời gian công việc. hint_color màu của text hint (dòng hướng dẫn) các EditText.
B5: Chỉnh sửa file strings.xml trong res\value:
<?xml version="1.0" encoding="utf-8"?>
<resources>
<string name="app_name">VD 3</string>
<string name="work_hint">Enter the work here</string>
<string name="hour_edit">Hour</string>
<string name="minute_edit">Minute</string>
<string name="button_content">Add work</string>
</resources>
B6: Time to coding. Đi tới src\at.exam tạo một class mới là CustomViewGroup với nội dung sau:
package at.exam;
import android.content.Context;
import android.view.LayoutInflater;
import android.widget.CheckBox;
import android.widget.LinearLayout;
import android.widget.TextView;
public class CustomViewGroup extends LinearLayout {
public CheckBox cb;
public TextView workContent;
public TextView timeContent;
public CustomViewGroup(Context context) {
super(context);
//Sử dụng LayoutInflater để gán giao diện trong list.xml cho class này
LayoutInflater li = (LayoutInflater) this.getContext()
.getSystemService(Context.LAYOUT_INFLATER_SERVICE);
li.inflate(R.layout.list, this, true);
//Lấy về các View qua Id
cb = (CheckBox) findViewById(R.id.check_work);
workContent = (TextView) findViewById(R.id.work_content);
timeContent = (TextView) findViewById(R.id.time_content);
}
}
Đoạn code trên giúp ta định nghĩa giao diện của custom ViewGroup mới dựa trên file list.xml. Mọi người cũng có thể tạo giao diện bằng code, ko cần sử dụng XML nhưng sẽ phức tạp hơn và mình cũng ko giới thiệu ở đây.
B7: Tạo 1 class Work cũng trong at.exam để thể hiện công việc:
package at.exam;
public class Work {
private String workContent;
private String timeContent;
private boolean isChecked;
public Work(String workContent, String timeContent) {
this.workContent = workContent;
this.timeContent = timeContent;
isChecked = false;
}
public String getContent() {
return workContent;
}
public String getTime() {
return timeContent;
}
public void setChecked(boolean isChecked) {
this.isChecked = isChecked;
}
public boolean isChecked() {
return isChecked;
}
}
Code rất đơn giản nên mình sẽ không chú thích nữa.
B8: Chúng ta đã tạo xong custem ViewGroup, bây giờ chính là lúc sử dụng. Tạo 1 class mới tên là ListWorkApdapter trong at.exam:
package at.exam;
import java.util.ArrayList;
import android.content.Context;
import android.view.LayoutInflater;
import android.view.View;
import android.view.ViewGroup;
import android.widget.ArrayAdapter;
import android.widget.CheckBox;
import android.widget.CompoundButton;
import android.widget.TextView;
import android.widget.CompoundButton.OnCheckedChangeListener;
public class ListWorkAdapter extends ArrayAdapter<Work>{
ArrayList<Work> array;
int resource;
Context context;
public ListWorkAdapter(Context context, int textViewResourceId,
ArrayList<Work> objects) {
super(context, textViewResourceId, objects);
this.context = context;
resource = textViewResourceId;
array = objects;
}
//Phương thức xác định View mà Adapter hiển thị, ở đây chính là CustomViewGroup
//Bắt buộc phải Override khi kế thừa từ ArrayAdapter
@Override
public View getView(int position, View convertView, ViewGroup parent) {
View workView = convertView;
if (workView == null) {
workView = new CustomViewGroup(getContext());
}
//Lấy về đối tượng Work hiện tại
final Work work = array.get(position);
if (work != null) {
TextView workContent = ((CustomViewGroup) workView).workContent;
TextView timeContent = ((CustomViewGroup) workView).timeContent;
CheckBox checkWork = ((CustomViewGroup) workView).cb;
//Set sự kiện khi đánh dấu vào checkbox trên list
checkWork.setOnCheckedChangeListener(new OnCheckedChangeListener() {
@Override
public void onCheckedChanged(CompoundButton buttonView,
boolean isChecked) {
work.setChecked(isChecked);
}
});
//Lấy về nội dung cho TextView và CheckBox dựa vào đối tượng Work hiện tại
workContent.setText(work.getContent());
timeContent.setText(work.getTime());
checkWork.setChecked(work.isChecked());
}
return workView;
}
}
ListWorkAdapter sẽ được sử dụng thay thế cho ArrayAdapter được bind với ListView. Thông thường ArrayAdapter chỉ cho hiển thị String bằng TextView, nhưng với việc kế thừa và override phương thức getView, ta có thể định nghĩa lại hiển thị cho các thành phần của ListView.
B9: Việc cuối cùng cần làm là viết lại Activity. Tới Example.java và chỉnh sửa theo nội dung sau:
package at.exam;
import java.util.ArrayList;
import android.app.Activity;
import android.app.AlertDialog;
import android.content.DialogInterface;
import android.os.Bundle;
import android.view.Menu;
import android.view.MenuItem;
import android.view.View;
import android.view.View.OnClickListener;
import android.widget.ArrayAdapter;
import android.widget.Button;
import android.widget.EditText;
import android.widget.ListView;
public class Example extends Activity {
//Các hằng dùng cho tạo Option Menu
private static final int DELETE_WORK = Menu.FIRST;
private static final int ABOUT = Menu.FIRST + 2;
ArrayList<Work> array;
ListWorkAdapter arrayAdapter;
@Override
public void onCreate(Bundle savedInstanceState) {
super.onCreate(savedInstanceState);
setContentView(R.layout.main);
array = new ArrayList<Work>();
arrayAdapter = new ListWorkAdapter(this,
R.layout.list, array);
final EditText workEnter = (EditText) findViewById(R.id.work_enter);
final EditText hourEdit = (EditText) findViewById(R.id.hour_edit);
final EditText minuteEdit = (EditText) findViewById(R.id.minute_edit);
final Button button = (Button) findViewById(R.id.button);
//Tạo list view cho danh sách công việc
final ListView list = (ListView) findViewById(R.id.list);
list.setAdapter(arrayAdapter);
OnClickListener add = new OnClickListener() {
@Override
public void onClick(View v) {
if (workEnter.getText().toString().equals("") ||
hourEdit.getText().toString().equals("") ||
minuteEdit.getText().toString().equals("")) {
AlertDialog.Builder builder = new AlertDialog.Builder(Example.this);
builder.setTitle("Info missing");
builder.setMessage("Please enter all information of the work");
builder.setPositiveButton("Continue", new DialogInterface.OnClickListener() {
public void onClick(DialogInterface dialog, int which) {
// TODO Auto-generated method stub
}
});
builder.show();
}
else {
String workContent = workEnter.getText().toString();
String timeContent = hourEdit.getText().toString() + ":"
+ minuteEdit.getText().toString();
Work work = new Work(workContent, timeContent);
array.add(0, work);
arrayAdapter.notifyDataSetChanged();
workEnter.setText("");
hourEdit.setText("");
minuteEdit.setText("");
}
}
};
button.setOnClickListener(add);
}
//Tạo Option Menu
public boolean onCreateOptionsMenu(Menu menu) {
super.onCreateOptionsMenu(menu);
menu.add(0, DELETE_WORK, 0,"Delete" ).setIcon(android.R.drawable.ic_delete);
menu.add(0, ABOUT, 0,"About" ).setIcon(android.R.drawable.ic_menu_info_details);
return true;
}
//Xử lý sự kiện khi các option trong Option Menu được lựa chọn
public boolean onOptionsItemSelected(MenuItem item) {
switch (item.getItemId()) {
case DELETE_WORK: {
deleteCheckedWork();
break;
}
case ABOUT: {
AlertDialog.Builder builder = new AlertDialog.Builder(this);
builder.setTitle("DNGAZ");
builder.setMessage("tac gia:" + "\n" + " DOTNET GROUP A-Z" + "\n" + "SOURCE:" + "\n" + " dngaz.com");
builder.setPositiveButton("Close", new DialogInterface.OnClickListener() {
public void onClick(DialogInterface dialog, int which) {
}
});
builder.setIcon(android.R.drawable.ic_dialog_info);
builder.show();
break;
}
}
return true;
}
private void deleteCheckedWork() {
if (array.size() > 0) {
for (int i = array.size() - 1; i >= 0; i--) {
if (array.get(i).isChecked()) {
array.remove(i);
arrayAdapter.notifyDataSetChanged();
continue;
}
}
}
}
}
OK. Vậy là xong. Option Menu là menu ẩn chỉ hiện ra khi bạn nhấn nút Menu của điện thoại. Option Menu rất tiện trong việc đưa ra các tùy chỉnh, giống như khi bạn nhấn phím Esc khi đang chơi game trên PC vậy.
Các bạn có thể lưu ý là thay vì sử dụng ArrayList<String> như trước mình đã thay bằng ArrayList<Work> và trong khởi tạo đối tượng arrayAdapter thì đối số thứ 2 là R.layout.list thay vì android.R.layout.simple_list_item_1, nghĩa là chúng ta đã sử dụng layout do mình tự tạo thay vì layout Android cung cấp sẵn cho hiển thị các thành phần của ListView.
Nếu chạy thử, các bạn có thể thấy khi ta đánh dấu vào checkbox của 1 thành phần trong list, rồi nhấn Menu và chọn delete thì thành phần sẽ bị gỡ bỏ khỏi danh sách.


Phần sau chúng ta sẽ cùng nghiên cứu Intent và Broadcast Receiver